Creating a serverless blockchain app with Symbol and Netlify Functions

Tutorial about “Creating a serverless blockchain app” First appeared on David Garcia’s Blog DavidGarcia.dev
In this tutorial we will see how to create a serverless blockchain application using Symbol and Netlify Functions.
In particular, we are going to create a blockchain faucet. But first, let’s review what all these concepts mean and how well they fit together.
What is Symbol blockchain?
Symbol is a blockchain platform allowing developers to access advanced blockchain built-in features using a REST API. You can use Symbol to integrate blockchain capabilities in new or existing applications with lightweight code. Read more about Symbol here.
… and serverless?
An application needs to live somewhere to be accessed by others.
Initially, applications were located in servers within the companies facilities. Now, it’s common to hire virtual machines from providers such as Amazon or Google, instead of owning the iron at home. Still, developers have to shift the focus from development to configure the servers, virtual machines, or containers to be able to run their applications.
The serverless architecture provides a higher abstraction for devs, enabling them to execute code in an environment entirely managed by others. In short, there is no time spent setting up the infrastructure, including configuration, availability, load-balancing …
One of the platforms offering Function-as-a-Service(FaaS) is Netlify, which adds a simplistic configuration layer on top of Amazon Lambda.
How everything fits together?
The first clear benefit of running a serverless blockchain app is that there is less infrastructure to maintain. Executing serverless functions is usually cheaper than running a highly available and distributed server 24 hours a day, considering that functions are charged per-use.
Secondly, reading from Symbol blockchain is as straightforward as consuming an API call. However, things start getting trickier when we have to change the state of the blockchain since nodes only accept serialized data. To serialize transactions, we typically use a Software Development Kit (SDK), but up to the moment, Symbol does not offer an SDK for every language. We can fill this gap by creating custom serverless functions in plain Javascript, that later can be consumed by apps written in any other language.
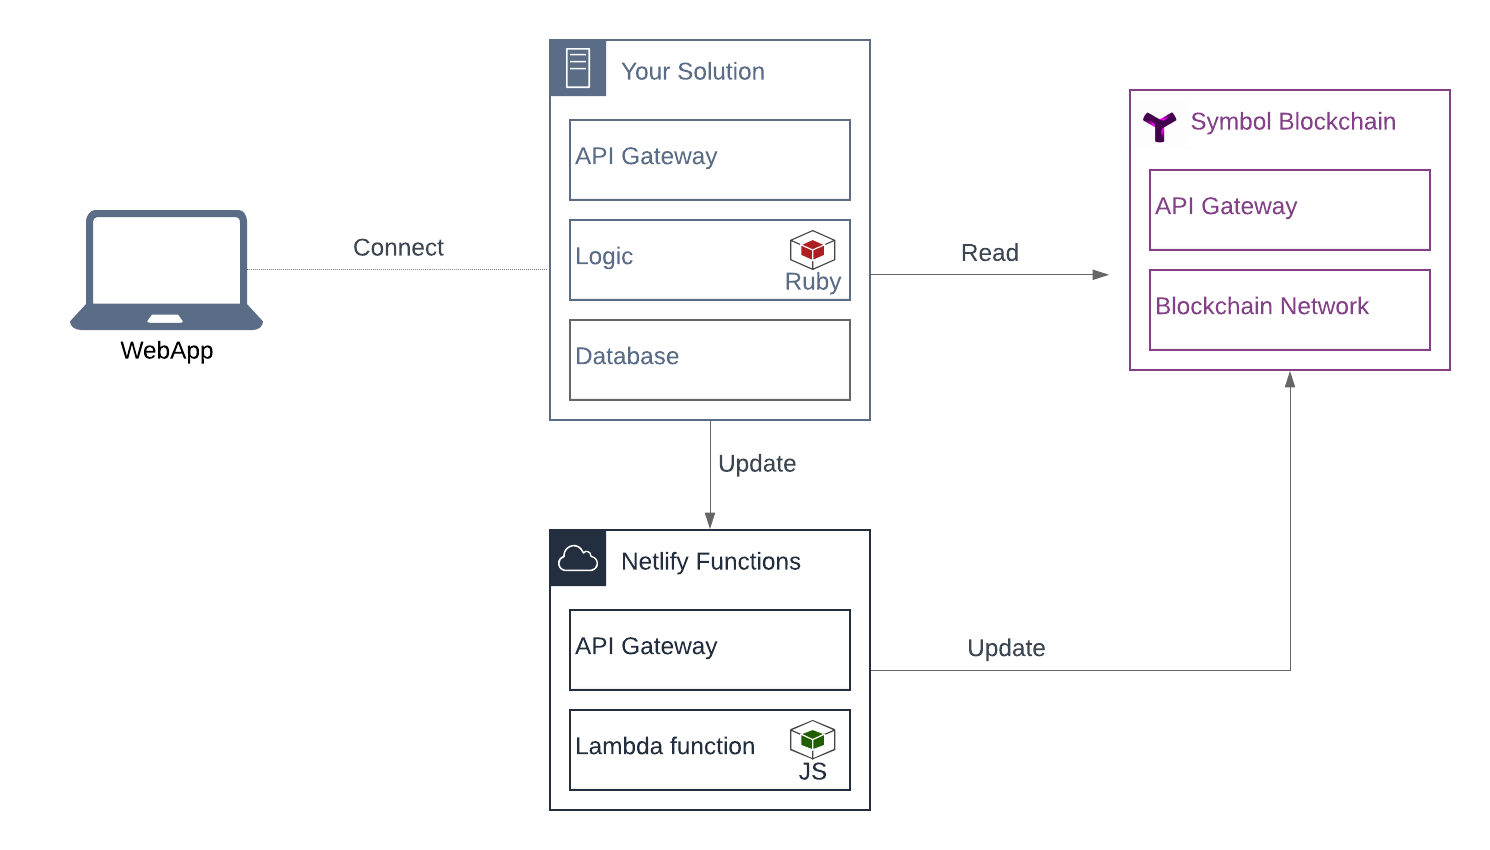
Imagine a company willing to integrate Symbol blockchain into their existent app written in Ruby. Unfortunately, there is no Symbol SDK for Ruby. Still, to overcome the problem, they could use a lambda function to record transactions on the blockchain.
Overview of the application
To show how can we combine serverless and blockchain apps, we are going to build a serverless blockchain app faucet for Symbol. Faucets are simple contracts that allow accounts to requests blockchain tokens.
Demo: https://symbol-faucet.netlify.com/
As Symbol applications can be developed in plain JavaScript, we might fail into the error to put all the logic inside the client application. However, to announce transactions, we need first to sign them with the faucet’s private key, and as the name suggests, this key should remain private at all costs. For that reason, we need to add an extra layer and move part of the application behind a server, where users cannot access to this private key.
The faucet presented is hosted on GitHub, made available to others thanks to Netlify’s CDN and their service called Functions.
Requirements
To run this example, make sure you have installed:
- Git
- NodeJS 12 LTS
- yarn
If you have not developed Symbol apps before, I recommend you to complete Symbol’s Getting Started section to create an account and send your first transaction to the network.
Download the boilerplate project
The project symbol-serverless-faucet has all the necessary components to deploy a server-less app.

Note: We are going to test the app first locally, and then deploy it to Netlify. If you want to deploy a custom faucet, jump to “Deploying the app” section.
1. Fork the repository dgarcia360/symbol-serverless-faucet.
2. Clone the forked repository in your local system.
git clone https://github.com/your-username/symbol-serverless-faucet.git
3. Enter the project and install yarn dependencies.
cd symbol-serverless-faucetyarn install
Developing a lambda function
First, we need to define the serverless function. The file src/lamba/faucet.js contains the function the faucet is using.
import querystring from “querystring”;
import {
Account,
Address,
Deadline,
EmptyMessage,
Mosaic,
MosaicId,
TransactionHttp,
TransferTransaction,
UInt64
} from “nem2-sdk”;
const {GENERATION_HASH, MOSAIC_DIVISIBILITY, MOSAIC_ID, NETWORK, NODE_URL, FAUCET_PRIVATE_KEY } = process.env;
exports.handler = async (event, context) => {
// Only allow POST
if (event.httpMethod !== “POST”) {
return {statusCode: 405, body: “Method Not Allowed”};
}
const params = querystring.parse(event.body);
const recipientAddress = Address.createFromRawAddress(params.address);
const amount = params.amount < 1000 ?
UInt64.fromUint(params.amount * Math.pow(10, parseInt(MOSAIC_DIVISIBILITY))) :
UInt64.fromUint(1000 * Math.pow(10, parseInt(MOSAIC_DIVISIBILITY)));
const transferTransaction = TransferTransaction.create(
Deadline.create(),
recipientAddress,
[new Mosaic(new MosaicId(MOSAIC_ID), amount)],
EmptyMessage,
parseInt(NETWORK),
UInt64.fromUint(2000000));
const account = Account.createFromPrivateKey(FAUCET_PRIVATE_KEY, parseInt(NETWORK));
const signedTransaction = account.sign(transferTransaction, GENERATION_HASH);
const transactionHttp = new TransactionHttp(NODE_URL, NETWORK);
transactionHttp.announce(signedTransaction)
.subscribe(x => console.log(x),err => console.log(err));
return {
statusCode: 200,
body: `Transaction announced: ${signedTransaction.hash}`
};
};
As you can see, a lambda function is developed similarly to any other API. In this case, the function takes as the input amount and address. Then, we define a transaction, sign it using the faucet’s account, and send it to the network. Finally, the function returns an OK response if the transaction was successfully announced.
All the environment variables are defined in the file .env, except for one: the private key.
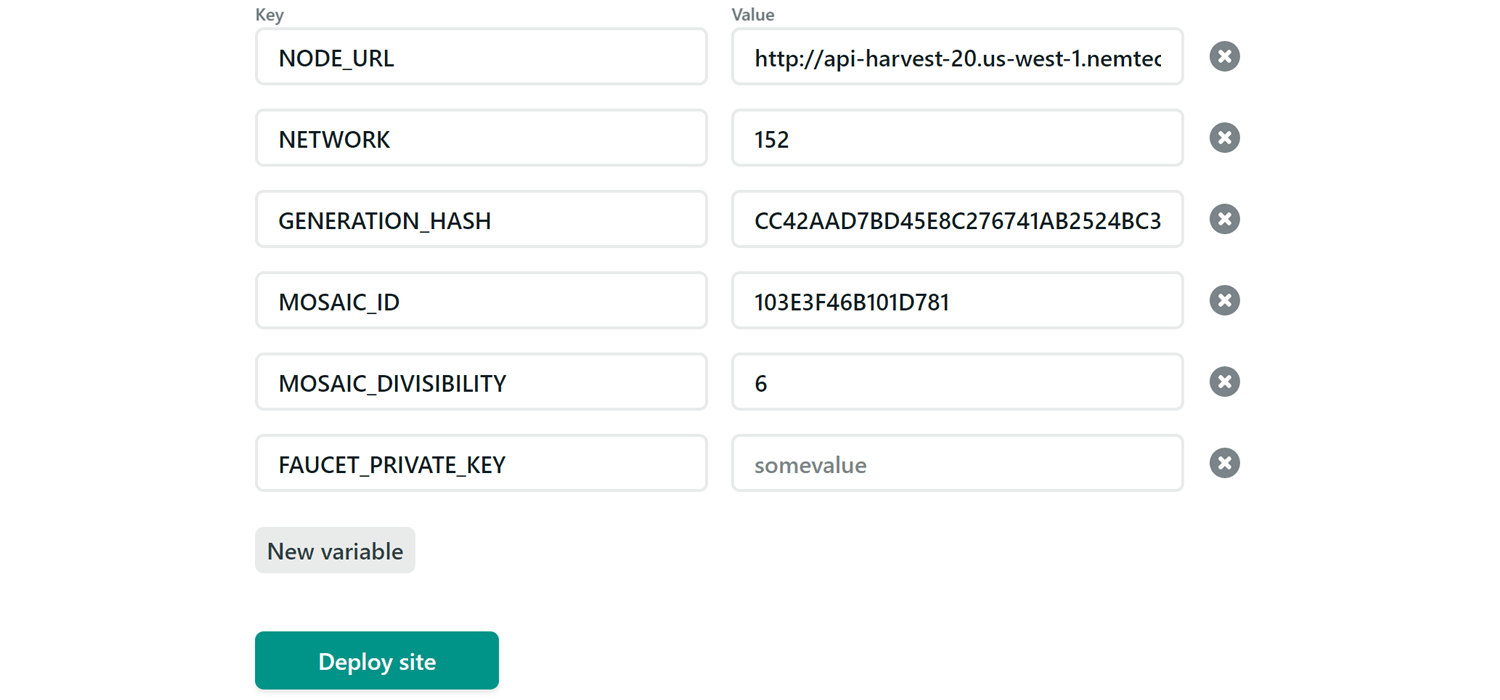
NODE_URL=http://api-harvest-20.us-west-1.nemtech.network:3000NETWORK=152GENERATION_HASH=CC42AAD7BD45E8C276741AB2524BC30F5529AF162AD12247EF9A98D6B54A385BMOSAIC_ID=103E3F46B101D781MOSAIC_DIVISIBILITY=6
Change the environment variables as desired. Then, open a new terminal and set up the faucet’s private key.
export FAUCET_PRIVATE_KEY=“my value”
Calling the function
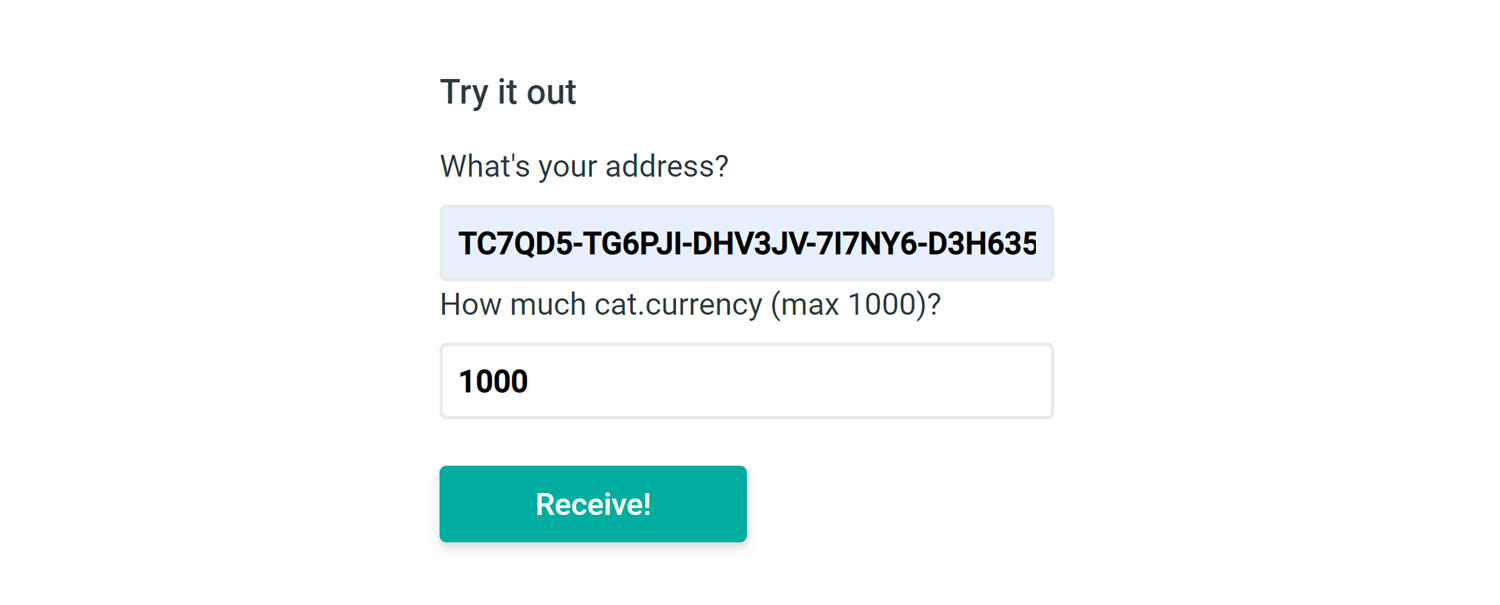
Now that we have defined the function, we can call it. The file src/index.html defines the form used to make a POST request to the serverless function.
<form action=“/.netlify/functions/faucet“ method=“POST“><p><label>What’s your address?<br/><input name=“address“ type=“text“></label><label>How many units (max 1000)?<br/><input name=“amount“ type=“number“></label></p><p><button type=“submit“>Receive!</button></p></form>
Test the app locally by running npm run start. Then, open localhost:8080 in a new browser tab.
Deploying the app
Now that we have created and tested the faucet, we can use Netlify to host the app. If you don’t have a Netlify account, sign up here first.
1. Create a new site from Git using this link.
2. Choose to deploy the site using your GitHub account.
3. Authorize Netlify.
4. Select the repo symbol-serverless-faucet.
5. Open the tab Advanced build settings and define the following environment variables:
6. Click on the “Deploy Site” button— and we are done!
If everything goes well, Netlify will show you the URL of the site after the app is deployed.
Putting all together
In this tutorial, we only have started to see what we can achieve by combining serverless functions and Symbol blockchain. Nevertheless, we can envision a wide range of promising possibilities. If you create a new serverless blockchain app using the boilerplate code, do not hesitate to share the link in the comments!
Previous articles from & with David Garcia
Guidelines for nem2-sdk development collaboration